Christina from The Sometimes Crafter shares a tutorial to make these adorable little fabric boxes. A great addition to a crafts room that uses fabric for accents, this would be a great way to coordinate some storage items!
With lots of photos, directions, and tips, the tutorial makes it sound really easy. Now I just need to pull out my sewing machine and give it a try.
Wouldn't they be perfect for all sorts of embellishments like buttons, clips, and ribbon?
Posted by Jessica


Sunday, February 28, 2010

Friday, February 26, 2010
Jodene Tripp's craft studio


Thursday, February 25, 2010
Rubber Stamp Storage

As most of you stampers know, storing stamps takes alot of space something most of us have very little of. This storage solution came from many sources and forums etc. Jennifer McGuire gave me the idea for the holders. She has since just changed her system. But that is what Crafty Storage is about, using methods that work for you and if they don't change to one that does. I just took and modified it to work for me.
This is not a project that can be done in a day. This did take me a few weeks and I prepared myself for that. Since I kept my stamps by type the first sort was easy.Sentiments, objects, birthdays etc. I then stamped each image on a 8 1/2 x 11 inch piece of cardstock. I then began to unmount my wood stamps by category. I put the stamps in the microwave for about 30 seconds. I then would remove the rubber from the wood and set aside.(There a numerous sites that can give you specific directions, just use a search engine and type unmounting wood stamps)
When I was done with the unmounting I used Alene's Tack over and over glue and put on the back of my unmounted stamps with a foam brush. I let them dry overnight then I used acrlyic sheets as a backing for the stamp. Then I used the Loose Leaf binder sheets from Office Depot to slide the sheets into. See below.

I then labeled each holder Objects 1, Objects 2, Sentiments 2, Sentiments 3, etc. This allows my system to grow because each new binder holder becomes the newest number and gets added the inventory notebook.
I then placed my stamped sheets into a notebook and used dividers to section them. I placed the stamped sheets in a sheet protector. I then used post its on the stamped images and then I counted how many object 1's I had and printed everything on the round labels that were made for the printer. I used a fun font. I then placed the round sticker on each image.


To keep my stamps sorted and organized I covered manilla file folders with decorative paper. I ran the tags thru my computer and then used my Nestabilities for the labels.
So when I get ready to stamp I pull out my Inventory Notebook and go to the category I need and I look at my choices and then I see the stamp is in Objects 2 then I pull the Objects 2 out and grab my stamp.
No more digging thru stamps. Easy peasy! Again remember that it was a long process but the results are so worth it. Please feel free to visit my blog

Wednesday, February 24, 2010
Another Crafty Sponge Idea
 Organizing sponges used for stamp crafting can be a pretty tricky and messy challenge. We've seen crafters across the world look for ways to do so.
Angie, at Chic' n Scratch, has found a unique way to re-purpose a great organizational item found in your garage [or buy new from your local home improvement store].
Read more about her system here.
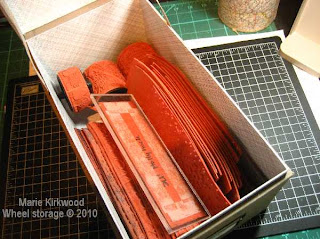
Storing Rubber Stamp Wheels
I "used to" store my Rollagraph and Stampin' Up! rubber stamp wheels on these pant hangers that I picked up at Linens & Things.
I "used to" hang them on the back of my craft room door using removeable 3M hangers (so as to not damage the door).
I "used to" hang them on the back of my craft room door using removeable 3M hangers (so as to not damage the door).
 I say "used to" because I eventually ran out of room and needed to come up with another solution.
So I started stripping the rubber off the plastic wheel - writing the name of the wheel in sharpie on the back!
2/24/10 Edited to add: I use an exacto knife to cut the seam on the wheel and then peel the rubber off the spool. I throw the spools in my recycling bin!
Now I store them ALL in just 1 Martha Stewart CD Storage box (and there is plenty of room for more wheels).
How do I use my wheels now?
I attach them to custom made acrylic blocks (from a local glass shop) using double sided tape and stamp away!  How do I keep track of which wheels I have?
How do I keep track of which wheels I have? I would love to tell you that I have a stamped sample of each one that I keep in the box - but I don't!
I simply photocopied the wheel page from the Stampin' Up! catalogue  and check off the ones I have.

and check off the ones I have.This works for me - maybe it will work for you too!
2/24/10 Edited to add: It's been suggested that I put my wheel rubber on Ez-Mount foam or use cling. I purposely chose not to do this because of the added expense and space that would take up. I do use Aleen's TIO&O for a lot of my unmounted rubber stamps but I didn't in this case because I didn't want my wheels sticking together in the box!
Posted by Marie
Tuesday, February 23, 2010
Metal Storage Bucket Idea
Hi Friends! Today I bring you not only a lovely storage idea...but it acts as beautiful storage, as well! Becky, over at StampThat.com, came up with this extra creative storage, which is being used to house chemicals, Stampin’ Mist, fixatives, exacto knives, etc! Who would have thought a metal container could be so beautiful?!

To read how Becky created this and to see the rest of her blog, click here. :)

To read how Becky created this and to see the rest of her blog, click here. :)
Monday, February 22, 2010


Sunday, February 21, 2010
Ribbon Storage Idea
I LOVE ribbon but ribbon storage is a problem for me!
I found these tin planters at Michaels and they are the perfect size for storing spools of ribbon.
This red planter holds ALL of my large spools of Stampin' Up! grosgrain ribbon:


This green planter holds the smaller spools of organdy ribbon:


When shopping for unique ways to store your ribbon remember to take a couple of different sized spools with you to test out if the container will fit or not!
Posted by Marie
Saturday, February 20, 2010
Promarker storage
Finding suitable storage for the pens which are popular at the moment can prove to be a tricky task. The storage which is purpose built is often not quite what you're after, and is often expensive too.
Gina from the Promarker Workshops blog has made her own storage, using an idea originally by Camilla. A cheap DVD unit is the starting point, plus some empty DVD cases. Storing promarkers like this is better for the pens, they should always be stored horizontally, not vertically. You can also adapt the size of the storage to suit the number of pens you have, maybe choosing a smaller DVD unit if you have yet to increase your pen collection.
 Gina used a colour chart created by her friend Debbi, and on the promarker blog she is happy to email out copies, so I am sure that offer is still open. Click on the link on her blog for more details.
 I think this storage looks great, and at £7.99 for the DVD rack, plus 14 empty DVD cases, it is hardly breaking the bank!
Thursday, February 18, 2010
CHA Winter 2010 Storage Solutions
Here are some of the organizational products unveiled at the 2010 CHA (Craft and Hobby Association) unveiled in Califronia back in January coming to a store near you.
Simply Renee came out with a new floor freestnding version of the Clip it Up
You can Read more about it here.
Scrapbook Storage Solutions also showed a great variety of its products including it's 12 Pieace Wall Organizer which seems a really practical way to store lots of tools for any craft. You can find it here.
Scrpacessories showed for the first time presenting its bottle caddy and its cartridge caddy for Cricut cartridges. Their web site is here.
Craft N Doodle made a great splash with its line of portable cases "The first portable carrying case that includes innovative, multi-purpose tools that were designed by a crafter for crafters"
This is a combination tools and storage solution great for small spaces or the traveler crafter with lots of options.
Simply Renee came out with a new floor freestnding version of the Clip it Up

You can Read more about it here.
Scrapbook Storage Solutions also showed a great variety of its products including it's 12 Pieace Wall Organizer which seems a really practical way to store lots of tools for any craft. You can find it here.
Scrpacessories showed for the first time presenting its bottle caddy and its cartridge caddy for Cricut cartridges. Their web site is here.
Craft N Doodle made a great splash with its line of portable cases "The first portable carrying case that includes innovative, multi-purpose tools that were designed by a crafter for crafters"
This is a combination tools and storage solution great for small spaces or the traveler crafter with lots of options.
Wednesday, February 17, 2010
Toy storage turned paper storage

Tuesday, February 16, 2010
Bendichte's studio
.jpeg)
.jpeg)
Sunday, February 14, 2010
Just Hangin’ Around
I’m Alyssa from the Persnickety Peacock, and if all goes well I’ll be around here on a semi-regular basis.
So let’s talk about organizing your craft space.
Raise your hand if you wish you had more space in your craft room. Well, I’m right there in the boat with you. Because I have no room and I refuse to give up any of my “cafting space” to storage, I always look for innovative ways to store my supplies.
One of my favorite organizational plans involves hanging your craft supplies. There are numerous tools that can be repurposed and hung around your room. Not only does this get your supplies organized, it creates beautiful eye candy and allows you to have easy access to all of your supplies.
For example, take your over the door shoe organizer.


Use this organizational tool to store your stash fabric…


Pictures from sweetjessie.com
Your scrapbook punches…


Pictures from Alyssa Barnes
The over the door hanging storage can hold almost any crafting supplies.
Be on the watch for additional posts about hanging craft storage!
Friday, February 12, 2010
Wednesday, February 10, 2010
Make your own Clip It Up Storage
This is a great storage alternative by Denise Hill of Paper Pastime. I am sure you have all seen the clip it up, a storage solution by Simply Renee. Denise set her sights on designing her own

and I just have to say, she has done so both successfully and very inexpensively and I am gonna run out and make one for myself!

She calls it her El Cheapo Clip it Up and she made it for under $2.00 using 1/4 inch wooden dowel, 2 cup hooks and a bag of 2" badge ID clips, an incredible solution!

and I just have to say, she has done so both successfully and very inexpensively and I am gonna run out and make one for myself!

The originial "Clip it up" has many different designs and retails between $20 - $80, depending on the one you choose, you can find them here.
Monday, February 08, 2010
Mikki's Rubba Room
I'd like you to check out this stamp space from Mikki Madden.

She really knows how to utilize her vertical space - she has a "theory of going up" when it comes to storage.
To see more of Mikki's space click here.
Posted by Marie
Saturday, February 06, 2010
Book of Nestabilities
I recenlty joined the Nestablilities Group over at Paper Craft Planet. My attention was immediately drawn to some photos on the main group page. Terry has created a binder just for her Nestabilities. She tells me the pages are magnet sheets adhered to cling foam stamp storage panels. The outside is decorated beautifully. I have been experimenting with magnet sheets inside CD cases but I'm finding they aren't as portable as I would like because the cases are getting scratched and cracked. Not too mention sorting through them all to decide which sets to bring to crops. I think a grab and go binder that you can flip through easily might just be the way to go. Terry is new to bloggin but I'll be checking back to see what else she comes up with.

Robyn has used the Bind it All to create a magnetic book for her Nestabilities. I am just in love with the grab 'em all and go storage.

Robyn has used the Bind it All to create a magnetic book for her Nestabilities. I am just in love with the grab 'em all and go storage.
Friday, February 05, 2010
Craft Room Roundup
I was recently directed to One Pretty Thing, (Thanks Sarah!) and their great Craft Room Roundup. Click here for it. It's full of great ideas that we may feature here in more detail!
Thursday, February 04, 2010
Making the most of a small space
Take a peek at a corner of Julie's crafts room, and you'll see how you can pack a lot into a small space - it just takes the right storage!
 (photo courtesy of Julie Buhler)
I spy with my little eye:
- Ikea EXPEDIT desk combination
- Ikea ALEX drawer unit on casters
- Ikea BYGEL rails and basket
(are you seeing a pattern here? Ikea really IS one of the best places for storage ideas!)
- Mini Stackable drawer unit
- wooden cassette holder - this is one of my favourite thrifty storage ideas: check yard sales, thrift shops, and flea markets for an old-school cassette holder, and then use it to store all your ink pads!
Check out Julie's blog, Paper Pleasing Ideas, for even more ideas!
Posted by Jessica
 (photo courtesy of Julie Buhler)
- Ikea EXPEDIT desk combination
- Ikea ALEX drawer unit on casters
- Ikea BYGEL rails and basket
(are you seeing a pattern here? Ikea really IS one of the best places for storage ideas!)
- Mini Stackable drawer unit
- wooden cassette holder - this is one of my favourite thrifty storage ideas: check yard sales, thrift shops, and flea markets for an old-school cassette holder, and then use it to store all your ink pads!
Check out Julie's blog, Paper Pleasing Ideas, for even more ideas!
Posted by Jessica
Wednesday, February 03, 2010
Kerry's Craft Room
Today I bring you some lovely pictures and even a virtual tour of Kerry's craft room. Kerry is super creative and I just LOVE to check out her blog (Kerry's Paper Crafts) for inspiration.
Here is where Kerry does all of her creating. She has tons of shelves and lots of great storage and organization ideas!


Here is where Kerry does all of her creating. She has tons of shelves and lots of great storage and organization ideas!


To see more pictures of her fabulous room and two awesome virtual tours, click here!
Enjoy and Happy Crafting!
Subscribe to:
Posts (Atom)