What you need:
Dignitet curtain rings from Ikea
command hooks
and string
What you do: select a place were you would like to hang your clip it unit like a wall, the inside of a door etc.
Install the Command hooks as far appart as you want them and tie the string around them.
Clip your dignitet hooks to your supplies and hang from string.
Here's mine inside a door the width is about 36"
Showing posts with label storage. Show all posts
Thursday, September 22, 2011
Monday, January 24, 2011
LeeAnn's new studio space
LeeAnn over at Flowerbug's Inkspot has an amazing new crafty space, thanks to her DIY husband! Check out the area for her classes:
Don't you love that bright, cheery green and the crisp white cabinets? And notice the size? They combined two rooms into one, giving LeeAnn an amazing 30 x 15 feet. Dreamy!
Here's a close-up of her workspace. Look at all that storage!


Don't you love that bright, cheery green and the crisp white cabinets? And notice the size? They combined two rooms into one, giving LeeAnn an amazing 30 x 15 feet. Dreamy!
Here's a close-up of her workspace. Look at all that storage!


Head over to LeeAnn's blog for more details and many more photos. Make sure you tell her Crafty Storage sent you!
Posted by Jessica
Posted by Jessica
Tuesday, November 16, 2010
Cheri's craft room transformation
Here's a photo of the "before:"
(photo courtesy of Cheri at I Am Momma - Hear Me Roar!)
And here's Cheri (and her boys) to give you a tour of her updated room:
She has some super fun ideas, including an amazing peek-a-boo door to her sons' playroom next door!
You can also see the post about her room on her blog. Be sure to leave her a comment, and let her know that Crafty Storage sent you!
Posted by Jessica
Friday, October 15, 2010
Dawn's metal die storage
Metal dies are all the rage, and the storage of those dies is a hot topic here at Crafty Storage.
Dawn over at My Favorite Things has a great idea for DIY die storage. And it's eco-friendly too!
Each die slips easily into the pocket, but is easy to see (thanks to the acetate). And if you read Dawn's blog, you'll know that a plain plastic basket won't do to store all the pockets - Dawn loves vintage, and has an amazing eye for style and colour (note how the colours of the cardstock coordinate with her blog!) - so she stores them in a vintage loaf pan. Cute and simple!
It's obvious how well this solution works with solid, larger dies, but it can be easily adapted to work with smaller dies (use a smaller piece of acetate) long, skinny dies (sew the pocket down the middle to hold two on one card), and even multiple stacked dies like Nestabilities (cut a thin magnetic sheet to hold the dies together and then slide it into the pocket.)
Check out Dawn's blog for more details on how she created the pockets. Love this idea? Let us know if you try it out, or if you have your own way to store metal dies (or other crafting tools.) We'd love to hear from you!
Posted by Jessica
Dawn over at My Favorite Things has a great idea for DIY die storage. And it's eco-friendly too!
She used a cardstock, leftover acetate sheets, and her sewing machine to create these simple and yet very practical die storage pockets!
Each die slips easily into the pocket, but is easy to see (thanks to the acetate). And if you read Dawn's blog, you'll know that a plain plastic basket won't do to store all the pockets - Dawn loves vintage, and has an amazing eye for style and colour (note how the colours of the cardstock coordinate with her blog!) - so she stores them in a vintage loaf pan. Cute and simple!
It's obvious how well this solution works with solid, larger dies, but it can be easily adapted to work with smaller dies (use a smaller piece of acetate) long, skinny dies (sew the pocket down the middle to hold two on one card), and even multiple stacked dies like Nestabilities (cut a thin magnetic sheet to hold the dies together and then slide it into the pocket.)
Check out Dawn's blog for more details on how she created the pockets. Love this idea? Let us know if you try it out, or if you have your own way to store metal dies (or other crafting tools.) We'd love to hear from you!
Posted by Jessica
Thursday, October 07, 2010
Marie's Embossing Folder Storage
Storage - it's one of the biggest issues I have with papercrafting and all it's tools!
The other day I wanted my Swiss Dots Cuttlebug embossing folder and it took me 20 minutes to find it!
So I found a little mini milk crate (used for CD storage) and labelled my folders with a Sharpie marker.
I then alphabetized them by Designer.
Yes I know the folder names appear upside down - or so it would seem - but when I'm using them in a class or for a demo they are right side up.
Besides I can read them easily if I position myself over the crate while I flip through them!
This works for me - maybe it will work for you too!
Posted by Marie
The other day I wanted my Swiss Dots Cuttlebug embossing folder and it took me 20 minutes to find it!
So I found a little mini milk crate (used for CD storage) and labelled my folders with a Sharpie marker.
I then alphabetized them by Designer.
Check this out:
Yes I know the folder names appear upside down - or so it would seem - but when I'm using them in a class or for a demo they are right side up.
Besides I can read them easily if I position myself over the crate while I flip through them!
This works for me - maybe it will work for you too!
Posted by Marie
Wednesday, September 08, 2010
Kirsty's Craft Room Tour
Kirsty has invited us all to take a tour of her craft room - although she calls it her dungeon as it takes up almost the entire basement! - take a look at this for organisation!
This is Kirsty's ink storage:

Some of her button and ribbon storage

Click here to visit Kirsty's blog for the full tour.
This is Kirsty's ink storage:

Some of her button and ribbon storage

Click here to visit Kirsty's blog for the full tour.
Wednesday, August 11, 2010
Craft Cubby
Check out this cute storage solution for keeping your "at hand" supplies handy and out of the way while at classes or crops!
It folds flat for easy portability when not in use!
You can find the tutorial for this and other nifty ideas for sale at Card a la Carte.
For those of you who do not sew, don't have a sewing machine or want to purchase a ready made Cubby I've got some for sale at my blog HERE with more on my sewing table!
Custom color orders accepted!
Sunday, August 01, 2010
Helena Söderberg's Craft Studio
I L.O.V.E. this room, so simple and modern. The combination of open and clossed shelving is great
The fabric is so nicely organized it feels like you are The Gap looking at the shirts dislpay,
She has this rack specifically for wrapping paper, what a great idea!
For more photos of Helena's studio visit her Flikr My New Craft Studio SetHer Flikr gallery is also amazing, you can visit her here.
Thursday, June 17, 2010
Sprinkling glitter
Shirley found this at Target and immediately thought of dispensing glitter out f it.
"I love keeping colorful supplies in view, they inspire me and this? Just makes me want to sprinkle something! :) "
Sh also use tictac's containers for these:
For more of Shirley's organizing ideas and a tour of her fabuloous studio visit here
Tuesday, May 18, 2010
How to store and organize your Digital stuff
I have started collecting digital images and papers. I don't have a lot but I thought I would set up a system to help me keep track of it.
Monday, May 10, 2010
Cheerful Studio from Jenny B. Harris
Illustrator, designer, and artist and crafter Jenny B Harris has one of the most cheerful, happy studios I've ever come across.
Look at all that fabric, and all the little containers! I wonder what is in them!More on her studio
Jenny's Blog
Saturday, May 01, 2010
Spices & Buttons?
What does this (see pictures below) have to do with Crafty Storage?
A few months ago I decided that it was time to get my spices off the counter. Living in a condo, we have limited space in our small kitchen. So, I made some tins to hang on the fridge. That left me with an empty spice rack. It's no longer taking up space on our kitchen counter, instead, it's in our spare room (my make-shift craft room).
The spice rack is happy to hold colorful embellishments now!
Do you have any "unusual" crafty storage advice? I would love to hear from others! :)
Wednesday, February 24, 2010
Another Crafty Sponge Idea
Organizing sponges used for stamp crafting can be a pretty tricky and messy challenge. We've seen crafters across the world look for ways to do so.
Angie, at Chic' n Scratch, has found a unique way to re-purpose a great organizational item found in your garage [or buy new from your local home improvement store].
Read more about her system here.
Storing Rubber Stamp Wheels
I "used to" store my Rollagraph and Stampin' Up! rubber stamp wheels on these pant hangers that I picked up at Linens & Things.
I "used to" hang them on the back of my craft room door using removeable 3M hangers (so as to not damage the door).
I say "used to" because I eventually ran out of room and needed to come up with another solution.
So I started stripping the rubber off the plastic wheel - writing the name of the wheel in sharpie on the back!
2/24/10 Edited to add: I use an exacto knife to cut the seam on the wheel and then peel the rubber off the spool. I throw the spools in my recycling bin!
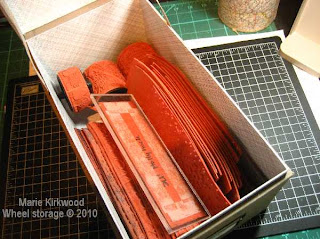
Now I store them ALL in just 1 Martha Stewart CD Storage box (and there is plenty of room for more wheels).

How do I use my wheels now?
I attach them to custom made acrylic blocks (from a local glass shop) using double sided tape and stamp away!
How do I keep track of which wheels I have?
How do I keep track of which wheels I have? I would love to tell you that I have a stamped sample of each one that I keep in the box - but I don't!
I simply photocopied the wheel page from the Stampin' Up! catalogue
and check off the ones I have.

and check off the ones I have.
This works for me - maybe it will work for you too!
2/24/10 Edited to add: It's been suggested that I put my wheel rubber on Ez-Mount foam or use cling. I purposely chose not to do this because of the added expense and space that would take up. I do use Aleen's TIO&O for a lot of my unmounted rubber stamps but I didn't in this case because I didn't want my wheels sticking together in the box!
Posted by Marie
Sunday, February 21, 2010
Ribbon Storage Idea
I LOVE ribbon but ribbon storage is a problem for me!
I found these tin planters at Michaels and they are the perfect size for storing spools of ribbon.
This red planter holds ALL of my large spools of Stampin' Up! grosgrain ribbon:

This green planter holds the smaller spools of organdy ribbon:


When shopping for unique ways to store your ribbon remember to take a couple of different sized spools with you to test out if the container will fit or not!
Posted by Marie
Tuesday, February 02, 2010
A Great Method for organizing you sponges!
Hello there Crafty Storage readers! My name is Cat, and this is my first post as a correspondent for Craft Storage. I'm looking forward to bringing you more creative Craft Storage ideas!
Today, I want to tell you about a fellow blogger/artist/designer who just posted
about the niftiest idea for organizing your sponges! You may have already heard of Michelle Zindorf - she has some of the best stamping tutorials available on the web - but if you haven't you need to make sure you stop by her blog Freedom in Creating. Prepare to be amazed!
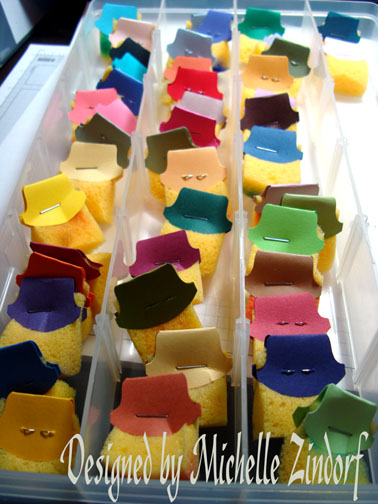
Michelle uses a lot of different tools when she's creating, but sponges are invaluable to her designs. And, she's found a great way to keep them neat and organized - and I'm sure it keeps her fingers from getting too inky as well.
Read more about it here!
Today, I want to tell you about a fellow blogger/artist/designer who just posted
Michelle uses a lot of different tools when she's creating, but sponges are invaluable to her designs. And, she's found a great way to keep them neat and organized - and I'm sure it keeps her fingers from getting too inky as well.
Read more about it here!
Monday, January 25, 2010
Where Shantaie Spends Her Days
Greetings everyone! I'm Jessica, and I'm SO excited to join the Crafty Storage blog team! I'm a lover of all things organization - I often joke that I spend more time organizing than I do crafting. So I think I'll fit right in here.
In this post, we step into Shantaie's garage-turned-crafts room.
As you take a look around, you'll see why she says:
"Paper crafting has all but taken over my own little corner of the house {and universe} I like to think of myself as multi-abled, and I don't really tie myself down to only one craft {art} life is too full of fun hobbies to settle for just one :) {plus I have a fear of commitment}"
I'd bet most of us share that sentiment - being creative doesn't mean you must be limited to just one specific craft!
There's a place for everything (and everything in its place) in her bright white room. And don't expect the ordinary craft storage pieces. Shantaie often uses everyday household items to store her tools and supplies, like the Cuttlebug and Big Shot plates tucked away in a napkin holder, and the die cut accessories all perfectly slotted into a shoe organizer.
One of the first things that caught my eye was the four numbered bags hanging on her peg board. Shantaie explained that she uses them to store various craft supplies, including sewing notions, gift wrap/bows/curling ribbon, and lots of buttons!
"I previously had ALL of that hanging on the peg board...it was functional but very "messy" looking thats when I wrangled it all into the fun bags, I numbered them so I could direct friends and family where to look for something I can say "its in bag 3""
To see some of her other great storage ideas, head on over to Shantaie's blog, Inking Pink. Be sure to leave her some love, and if you do, tell her Crafty Storage sent you!
Posted by Jessica
In this post, we step into Shantaie's garage-turned-crafts room.
(photo courtesy of Shantaie Fowler)
As you take a look around, you'll see why she says:
"Paper crafting has all but taken over my own little corner of the house {and universe} I like to think of myself as multi-abled, and I don't really tie myself down to only one craft {art} life is too full of fun hobbies to settle for just one :) {plus I have a fear of commitment}"
I'd bet most of us share that sentiment - being creative doesn't mean you must be limited to just one specific craft!
There's a place for everything (and everything in its place) in her bright white room. And don't expect the ordinary craft storage pieces. Shantaie often uses everyday household items to store her tools and supplies, like the Cuttlebug and Big Shot plates tucked away in a napkin holder, and the die cut accessories all perfectly slotted into a shoe organizer.
One of the first things that caught my eye was the four numbered bags hanging on her peg board. Shantaie explained that she uses them to store various craft supplies, including sewing notions, gift wrap/bows/curling ribbon, and lots of buttons!
"I previously had ALL of that hanging on the peg board...it was functional but very "messy" looking thats when I wrangled it all into the fun bags, I numbered them so I could direct friends and family where to look for something I can say "its in bag 3""
To see some of her other great storage ideas, head on over to Shantaie's blog, Inking Pink. Be sure to leave her some love, and if you do, tell her Crafty Storage sent you!
Posted by Jessica
Saturday, January 16, 2010
Re-purpose a TV Cabinet
Hiya! I'm Bec and I've just joined the crafty storage blogging team. I thought it was only fitting that as my first contribution here, I should post a bit of a sneak peek at how I store and organise things. I'm currently living in chaos - my fiance and I have just bought our first home and we're renovating the kitchen. So unfortunately, my craft room (aka the spare bedroom) is not as organised as it will be.
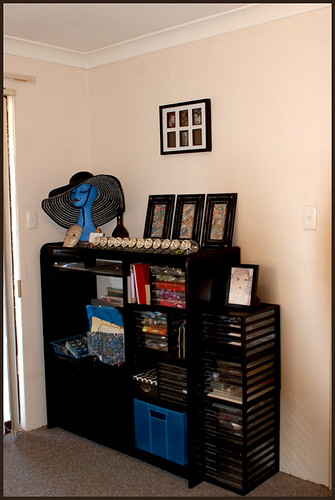
In my old house, I had a simple set up with lots of 'letter drawers', and old TV cabinet.
I found the TV cabinet worked quite well for small-space storage, and using it in my craft room saved it from going to the tip when we bought a larger tv.
Some of the benefits of using TV cabinet for craft storage
- The TV opening has room for vertical paper storage in wire filing racks, for completed scrapbook albums or bigger projects.
- The media shelves happened to fit my letter racks perfectly, but are adjustable to whatever height is required.
- The shelf for a vcr or dvd player was great for storing my trimmer and sketch pads.
- And the closed doors at the bottom hide a multitude of sins!
Subscribe to:
Posts (Atom)


Please check out my