I often look at things with an eye for using them for other things than what they were originally created for.
Nothing too out-of-box - in most cases it's how it can be used to help me organize my ever-growing supplies for papercrafting!
For example I keep my ribbon in planter boxes!
When it came time to re-organize my Nestability dies I had a solution I liked I just needed it to be BIGGER!
I ended up buying a LARGE 320 CD Storage Binder and I'm so pleased with it!
Click HERE to go to my blog and see the photos.
To see other ideas for storing your Nestabilities dies click HERE.
posted by Marie
Thursday, September 30, 2010
Tuesday, September 28, 2010
Diana's studio
Sunday, September 26, 2010
Beth's fabric storage
Friday, September 24, 2010
Sarah Youde's Craft Room
Sarah has shared the making of her fabulous craft room
 She shares pictures from building works through to her beautiful work area. She also has some great storage ideas:

Look at these gorgeous sweetie jars

And these Ikea spice jars

Believe me she has a lot more to share, like how she stores her chipboard alphas, all of her different ribbons, her acrylic and rubber stamps, click here and enter the gallery to see more.
 She shares pictures from building works through to her beautiful work area. She also has some great storage ideas:
Look at these gorgeous sweetie jars

And these Ikea spice jars

Believe me she has a lot more to share, like how she stores her chipboard alphas, all of her different ribbons, her acrylic and rubber stamps, click here and enter the gallery to see more.
Wednesday, September 22, 2010
Jennifer's Craft Room
Jennifer has a room in her basement which has her craft room in it, its been beautifully finished and as you will see, she has some great storage ideas, click here to have a look.

I just love this shelf, its actually an antique drawer turned on its side! It holds Jennifer's wood stamps and PTI ribbon. It used to also hold her PTI stamp sets in CD cases until she recently changed how she stores them. (See bottom of this post)

Just look at this narrow depth drawer she stores her punches in, she only has a few!

Look at these gorgeous trifle bowls, one bowl holds small ribbon bits, another holds flowers, and the last holds buttons.

If you do visit Jennifers blog, be sure to have a look at her Best Scrapbook Shelf in this post where she stores most of her cardstock, inks, emblishments etc and her clear stamp storage in this post which is just fantastic and I'm going to have a go at myself.

I just love this shelf, its actually an antique drawer turned on its side! It holds Jennifer's wood stamps and PTI ribbon. It used to also hold her PTI stamp sets in CD cases until she recently changed how she stores them. (See bottom of this post)

Just look at this narrow depth drawer she stores her punches in, she only has a few!

Look at these gorgeous trifle bowls, one bowl holds small ribbon bits, another holds flowers, and the last holds buttons.

If you do visit Jennifers blog, be sure to have a look at her Best Scrapbook Shelf in this post where she stores most of her cardstock, inks, emblishments etc and her clear stamp storage in this post which is just fantastic and I'm going to have a go at myself.
Monday, September 20, 2010
Lori's new craft room
Lori's original craft room suffered an unfortunate flood. So she had to redo it, and of course, she did it in great style.
Click here for the post in which the process is detailed and explained. And here for the main page of her blog.
Saturday, September 18, 2010
"Projects in Progress" Storage.
I'm sure I'm not the only one that gets called away from the crafting desk in the middle of a project. Whether the kids start yelling, dinner is burning, or your pager goes off and you need to respond for a SWAT call (we're out there)... You don't want to leave all the work you've done just laying there to get lost or spilled on.
One of my newest additions to the "works for me" side of my storage list are these trays I found at Target. They are 13x13 so they hold your scrapbook papers and also fit in the IKEA Expedit shevling system. If you don't have these trays that maybe you can convert other trays around the house. Before this I was using paper box lids.
One of my newest additions to the "works for me" side of my storage list are these trays I found at Target. They are 13x13 so they hold your scrapbook papers and also fit in the IKEA Expedit shevling system. If you don't have these trays that maybe you can convert other trays around the house. Before this I was using paper box lids.
Thursday, September 16, 2010
Kim's new craft room
Tuesday, September 14, 2010
Maria's Studio


In contrast to my cropspace is the interior modern. For my studio I choose the colors purple and White(& Black). And for the accents I used metal/silver, like the Tim Holtz storage boxes (Cropper Hopper), which I believe are not for sale anymore. Like many other craftrooms I have storage systems from Making Memories and Ikea. Most of the furniture are also from Ikea.
Links to my blog: mijn studio and my blog
Storage details:

Sunday, September 12, 2010
Recycling Hospital furniture
After a few years doing this blog, it is rare nowadays when I see something completely unexpected and really clever as a Crafty Storage. This one from Gerry it is.
I will let Gerry explain it:
I live in a small house and a room for sewing or crafting is just not an option so I work in the living/dining area and EVERYTHING is on wheels... This work area I use for crazy quilting and if we entertain or need the space, it all rolls into the laundry room.. It occupies a space of about 4x4'. The main star of this setup is the used hospital bedside table on wheels which I love... So since I am going to be painting lots of buttons to sell I set up another another bedside table I found recently at a thrift store... and blogged about it...
I sure you must have other followers who live in apartments or small homes who could use these ideas...
To go to Gerry's blog, click here.
Friday, September 10, 2010
Klo's Studio
Klo has been lucky enough to have a few different studio spaces but her most latest redesign is my favourite.
The black and red color scheme is so chic!
But the most interesting piece in the room - in my opinion - is the screen door she's mounted on one wall!
We'll have to keep checking her blog to see what she's going to do with that.
Click HERE to see more of Klo's space.
posted by Marie
Wednesday, September 08, 2010
Kirsty's Craft Room Tour
Kirsty has invited us all to take a tour of her craft room - although she calls it her dungeon as it takes up almost the entire basement! - take a look at this for organisation!
This is Kirsty's ink storage:

Some of her button and ribbon storage

Click here to visit Kirsty's blog for the full tour.
This is Kirsty's ink storage:

Some of her button and ribbon storage

Click here to visit Kirsty's blog for the full tour.
Saturday, September 04, 2010
Suzanne's Stamping room
Love it! I will let Suzanne explain it.
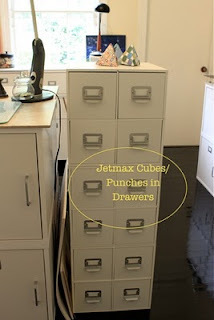
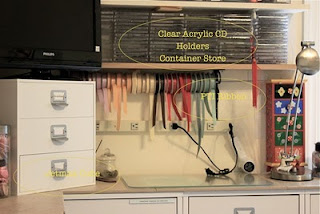
All my cabinets except those on the right wall are built on casters and actually roll into different configurations so that I can change the floor plan when I have friends over for classes. The walls are a pale yellow and the floor is a dark black hardwood. All trim and cabinets are white. The tile on the cabinet tops are 16 inch floor tile and are not fastened down so that I can change the configuration of the cabinets as I like. The words on the walls are vision, art, dream, and imagination. I hope you enjoy looking at my space - I have enjoyed showing it off.
Suzanne
Looking in from the door:
My main work area:
That tall stack you see in the first photo:
On the walls to the right of the door:
Further down the wall to the right of the door:
Closeup of the Caboodle wall to the right of the door:
More detail about the Caboodle wall items and a different viewpoint:
To the left of the door, behind my chair:
Close up view of the left wall:
Closer view of the window wall with some labels:
Even more detail of window wall:
Thursday, September 02, 2010
Small embelishment storage
I like to have my small embelishments visible and handy so I don't forget I have them, I also like to be able to bring most of them to my work table where the projects are so I can try several so here's the way I store them

Inside small jars on a tray that sits on my cabinet. The tray was purcahsed at a home decor store, the containers are from the beading section at the craft store, they come in a pack of 12 inside a larger square box
Here's a close up of the tray.

Inside small jars on a tray that sits on my cabinet. The tray was purcahsed at a home decor store, the containers are from the beading section at the craft store, they come in a pack of 12 inside a larger square box
Here's a close up of the tray.
Subscribe to:
Posts (Atom)


